

 Ductwork, ducts, or ducting, are conduits, or tubes, that typically form part of a ventilation system, used to convey air throughout a building. An example of a simple elementary duct is a fireplace chimney, used to convey smoke to the outside. Hard pipes used to transfer water or gas are not classed as ductwork.
FURNACE DUCTWORK
Combustion Air Duct Connected to the Return Plenum.
 When the combustion air duct is connected directly to the return plenum for a furnace, the blower fan on the furnace pulls outdoor air into the return plenum. To supply this air to the furnace room, a supply register is added to the ductwork in the same room, typically right above the furnace. This is an undesirable setup, for a number of reasons.
Waste of Energy
During the winter, this setup pulls cold outdoor air into the house, directly into the return plenum for the furnace. While a combustion air duct that terminates at the floor will allow cold air to come into the house, it’s not nearly as much air compared to the duct connected to the furnace return plenum. When it’s very cold outside, that’s a ridiculous amount of cold air being pumped into the house, but because it gets tempered by the furnace, nobody feels it. This is a big waste of energy.
Also, this setup pulls warm, moist outdoor air into the house just before the air conditioner’s evaporator coil. Again, this is a waste of energy.
Pressurizes the House
When a combustion air duct is connected directly to the return plenum on a furnace, the house becomes pressurized when the furnace blower fan starts running. How does this air leave the house? Anyway, it can; plenty of these household air leaks were covered in this post about why houses need combustion air ducts.
The air leaks that really cause problems are the air leaks found in the attic. Attic air leaks lead to frost in the attic as well as ice dams, and the effect is magnified when a combustion air duct is connected to a furnace return plenum.
Code Violation
As a home inspector, I don’t get hung up on code requirements, but as long as I’m blogging about this topic, it’s worth mentioning that the Minnesota State Mechanical Code no longer allows the combustion air duct to be connected to the return plenum. Section 708.1, #3 says:
[Combustion air ducts shall:] Terminate in an unobstructed space allowing free movement of combustion air to the appliances.
Frequently Disabled
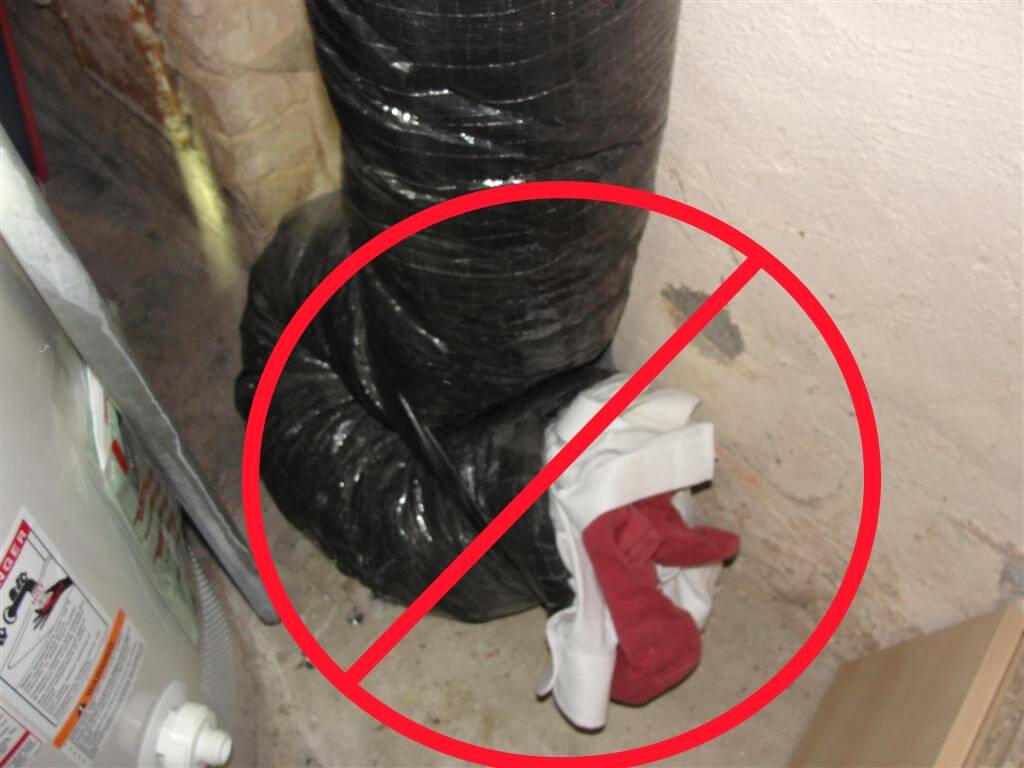
While it’s common for home inspectors to find combustion air ducts stuffed shut with clothing inside the house, it’s actually even more common for the combustion air duct to be disabled when it’s connected to the return plenum.
Remember, that register above the furnace is what supplies combustion air to the furnace room. Because this register is located right above the furnace, it’s also the most powerful register in the house, which makes the furnace room very warm during the winter. When well-intentioned homeowners don’t understand how their combustion air is connected, they assume that the register above the furnace is only there to supply heat to the room, so they block it off to get more heat to the areas that matter. This prevents combustion air from getting to the appliances that need it.
What To Do
If the connection from the combustion air duct to the return plenum is visible inside the house, the fix for this situation is simple: have the combustion air duct disconnected from the furnace return plenum, and have the duct dropped down into the room. Also, have the old hole in the return plenum blocked off. Any HVAC contractor should be able to help make this simple change, which is something we’ve recommended to countless home inspection clients.
Reference: Structure Tech
Duct Shaft Layout

When developing a duct shaft layout, architects must account for steel supports, duct take-offs, dampers, and insulation. Consult with an HVAC engineer for the needs of a particular system.
General Layout
Provide 9″ from the sheet metal to the inside face of a shaft.
Provide 12″ from the sheet metal to the inside face of a shaft on the sides where there is a duct take-off. See the note below for information about dampers, which can require up to 24″ of clear space.
Provide 9″ between ducts (sheet metal to sheet metal).
The designer must also consider structure or deck/slab edges.
While maintaining the above dimensions, also provide a minimum of 6″ from the face of the duct/slab to the deck edge.
While the diagram above shows the support steel sitting on top of the slab edge, the supports can also be attached directly to the face of the slab edge if there is a steel bent plate to receive a weld. The photograph below shows this type of condition.
Dampers
Consult with the damper manufacturer for dimensional requirements. Fire dampers generally require 15″ between the duct face and the inside face of the shaft wall. Combination Fire and Smoke dampers can require up to 24″ of clear space between the duct face and the inside face of the shaft wall. In addition, the damper must be accessible so that the unit can be reset after it has been closed.
Reference: Archtoolbox
Flexible Ducts

Using flexible ducts saves time, but careless installation can cause performance-related problems that are hard to find and even harder to fix after the drywall goes up
Seal the Ducts With Mastic
All ducts should be sealed using UL-181–rated duct mastic [1], and flexible ducts should be held in place with tie wraps at all connectors. Ideally, all ducts should be located within the conditioned space. This is typically the case for ducts that run through a dropped ceiling or soffit, or between joists, so long as the floor system sits on top of a conditioned basement or crawlspace. Attics can be problematic when insulation is located on the attic floor rather than in the rafter bays or, better yet, outside the roof sheathing.
When flexible ducts are located outside the conditioned space, they should be sealed to prevent loss of conditioned air and also insulated to prevent thermal loss or gain from the ambient air.
All ducts, whether rigid or flexible, should be sealed with UL-181–rated duct mastic. Duct tape has many uses, but sealing ducts isn’t one of them.
Use Only What You Need
Friction is the enemy of airflow. Unlike rigid ducts, which are cut to length within a tolerance of 1 inch or less, it’s easy to cut a length of a flexible duct that’s several feet longer than is needed to get from point A to point B [2A]. That creates slack in the duct, which reduces airflow for two reasons. First, because the air has to travel farther, it is exposed to more of the duct’s interior surface area. Second, because the duct isn’t stretched tight, the wire ribs in the duct create more friction than usual along the entire length of the duct.
To maintain strong airflow, plan for short straight runs during the design phase. Pay particular attention to the framing plan, and route ducts through floor trusses where possible [2B]. Monitor the plan during framing and be prepared to create chases to carry ducts where necessary. Also make sure that all ducts, regardless of length, are stretched tight between fittings.
Don’t Get Kinky With Your Flexible Ductwork
Airflow in a duct run of any length can be compromised by sharp turns or even kinks. And each turn, kink, or compression in a duct run reduces airflow, which results in more comfort-related complaints from your customers.
Unfortunately, on many job sites, poor planning of the framing and lack of coordination among substrates result in all manner of bends and kinks, some of which all but stop airflow completely [3A].
Once the drywall is up, these problems are impossible to locate, so carefully inspect flexible ductwork before the drywall crew begins its work. Kinks are comparatively easy to spot, but a sharp bend can constrict airflow and is more difficult to see [3B]. Where bends can’t be avoided, make sure that the radius of any turn is at least the same dimension as the duct diameter. For example, the center line of a bend in an 8-inch–diameter duct should follow a curve with a radius of at least 8 inches [3C]. One easy way to ensure that bends meet this standard is to use metal elbows at these critical locations.
Support the Ducts
Sometimes the best route for a flexible duct run is up and over an obstruction. But without proper support, ducts can develop sags or kinks that reduce airflow [4A, 4B].
To prevent problems, use saddles or straps to support them at regular intervals [4C, 4D]. Follow the manufacturer’s instructions, but in case they “get lost,” here is a list of best practices for supporting ducts:
-
-
- Space supports no more than 4 feet apart (a connection to a rigid duct or to equipment counts as a support point).
- Supports should be at least 1½ inches wide.
- In long horizontal runs with sharp bends, use extra supports before and after the bends.
- Don’t let the ducts sag more than ½ inch per foot between supports; maximum sag shouldn’t exceed 2½ inches [4E].
- Support straps should not compress the inner core or constrict airflow.
- Supports should not constrict the insulation because that can cause cold spots and condensation, which can lead to mold growth.
-
Reference: ![]()

Dryer Vent Cleaning
We use specialized equipment to clean the entire dryer vent from the dryer connected to the roof vent. We are a licensed HVAC contractor so we will repair dryer ducts if needed. We help ensure your safety from fire.
-
- Here are warning signs of a potential fire hazard:
- 1. Clothes take more than 1 cycle to dry.
- 2. Clothes are unusually hot after 1 cycle.
- 3. Dryer is hot to the touch after 1 cycle.
- 4. Clothes have a moldy smell after the dry cycle
- 5. Dryer consistently stops during a cycle
Premier 8-Step Residential Air Duct System Cleaning with HVAC Contractors
Improper maintenance of the HVAC system, including the duct system, can lead to an accumulation of dirt, dust, and moisture which can restrict air flow and jeopardize the quality of the indoor air. To guarantee results we must clean the entire air duct system from the point air enters through the evaporative cooler or the return of the furnace or refrigerated air conditioner.
1. Protect the Home & Office with a clean drop on the floors and furniture.
Performance Leaders are your primary on-field leaders. They take charge of your team in practice and competitive settings to focus on people. Captains provide the strong vocal leadership necessary to help your team perform to its potential during practices.
2. Place the system under suction with our huge power vacuums.
This method involves the use of a portable vacuum with High-Efficiency Particulate Air (HEPA) filtration. There is direct contact between the brush head and the interior of duct surfaces to dislodge and remove dirt and debris.
3. Open the cooler or air conditioner and clean all interior surfaces.
This method involves the use of pneumatically or electrically powered rotation bristle brushes to loosen dirt and debris which are drawn downstream into a vacuum collector. Care should be taken not to damage the duct walls or insulation surfaces. Only flexible bristle brushes should be used.
4. Power brush all interior surfaces of the duct and then blow debris toward vacuums.
This method involves the use of pneumatically or electrically powered rotation bristle brushes to loosen dirt and debris which are drawn downstream into a vacuum collector. Care should be taken not to damage the duct walls or insulation surfaces. Only flexible bristle brushes should be used.
5. Power brush all surfaces in the attic or floors then blow debris toward vacuums.
This method involves the use of pneumatically or electrically powered rotation bristle brushes to loosen dirt and debris which are drawn downstream into a vacuum collector. Care should be taken not to damage the duct walls or insulation surfaces.
6. Disassemble the furnace blower and clean interior surfaces.
We start by cleaning and changing your furnace filter if needed, to reduce dust and other airborne particles inside your home. We take the same precautions so as not to damage anything.
7. Clean return chamber under furnace, remove insulation and remove, and clean and reinstall all registers and returns grills.
8. Remove drops sweep and vacuum floors to complete your Air Duct Cleaning.
Chimney Cleaning and Repairs

Why Annual Inspections are Needed for ALL Fireplaces?
All wood and pellet burning fireplaces, stoves, and inserts need to be inspected every year and cleaned when there is 1/8” or more of creosote buildup. Extremely dirty chimneys, like the one pictured here, are very dangerous and should not be used until they are thoroughly cleaned. Gas fireplace manufacturers recommend that all gas fireplaces and inserts be inspected and serviced every year before they are used, to ensure safety and proper performance. Using a trained chimney sweep to periodically clean your chimney, is highly recommended, to help prevent a chimney fire from occurring.
Professional Chimney Sweep
We use powerful vacuums with special filters that prevent soot and dust from entering the home, during our cleaning. We spread large clean drop clothes in front of the chimney and put all of our equipment on top of them. None of our equipment touches your floor, and we are careful to take precautions in order to prevent any mess. We conduct a Level 1 inspection of the readily accessible areas of the chimney and fireplace during our normal cleaning. If needed, a level 2 inspection provides additional checks of chimney conditions and interior flues and some difficult-to-reach spots like crawl spaces and attics. Level 3 includes further inspection of those areas that have been enclosed.
Chimney Repair
The outside and top of your chimney are constantly exposed to the sun and weather and will deteriorate over time. The chimney crown and mortar joints will crack and allow moisture to penetrate into the interior of the chimney. During the colder months, this moisture may freeze and expand, further damaging the structure of your chimney. It is important that all cracks and gaps be repaired on a regular basis. Cast concrete crowns that extend past the edge of the brick or stucco walls, allow moisture to drain directly to the roof, reducing the chances of water damage.
We can also perform repairs on the firebox, where you build the fire, which is constructed using firebrick and a special high-temperature refractory mortar that is designed to help resist the deterioration caused by the heat of the fire. The firebrick expands and contracts when the fire is burning and will eventually crack and deteriorate. When cracks occur, the firebrick will become loose and eventually will need to be repaired or replaced. Re-pointing the mortar joints, when they crack, will prolong the life of the firebox. The firebox should be rebuilt when the firebrick gets loose and start to fall out.

